Top Madeira Hikes for Photographers, Capturing the Island's Landscapes
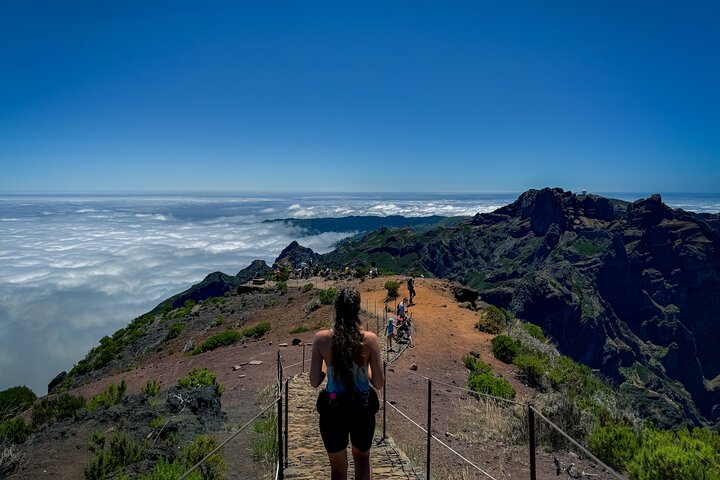
I arrived at Pico do Arieiro at 5:15 AM in March with a tripod I'd carried from Porto in my luggage, hoping for the classic shot: the sun rising above a sea of clouds with Pico Ruivo silhouetted in the foreground. What I got instead at 6:47 AM was a cloud inversion so dense that the viewpoint resembled an airplane window, nothing but white in every direction. I waited. At 7:08 AM, a gap opened in the cloud layer directly above the valley, maybe 200 metres wide, and golden light poured through like a theatre spotlight. I got three frames before the clouds closed again. That single image, of light falling on a sliver of laurel forest 800 metres below, is still my favourite photo of Madeira. The island doesn't give you the shot you planned. It gives you the shot you were patient enough to wait for.
Madeira is a photographer's dream: volcanic peaks, ancient laurel forests, dramatic coastlines, and that famous sea of clouds that fills the central valleys below 1,200 metres. But knowing which trails to hike and when to be there makes the difference between a memory card full of snapshots and a portfolio of images you'd actually print. After 400+ km of hiking with a camera strapped to my back, I've learned where the light hits top, when the crowds thin out, and which trips let you focus on composition instead of navigation. I recommend booking a sunrise transfer hike to Pico do Arieiro for the top chance at epic light without worrying about parking logistics.
For epic sunrise shots above the clouds, PR1 Pico do Arieiro → Pico Ruivo with a guided transfer is unmatched, arrive by 6 AM for golden hour and a cloud inversion that happens roughly 3 mornings out of 5 between May and October. For lush, moody forest photography, PR18 Levada do Rei offers the island's top moss-and-ferns-in-mistlight conditions, especially after light rain. For dramatic coastal landscapes at golden hour, an eastern jeep tour gets you to Ponta de São Lourenço and the north coast viewpoints without worrying about winding mountain roads in the dark.
Understanding Madeira's Light
🇵🇹 Before You Hike (2026 Update)
SIMplifica booking is now mandatory for all classified PR trails in Madeira. You must book online before arrival and show a QR code at the trail entry.
- Standard trails: €4.50 per person
- PR1 (Pico do Arieiro → Pico Ruivo): €10.50 per person (from April 2026)
- Book at: simplifica.madeira.gov.pt
Check trail status before you go: IFCN official trail status · IPMA weather
📌 PR1 spent part of early 2026 partially closed for rockfall repairs. It has since reopened. Always verify current status with IFCN — conditions change. Guided tours that include your trail fee are a convenient option — see recommended tours below ↓
Madeira sits at 32° north latitude, which means the sun rises and sets at a steep angle year-round. The golden hour is shorter than at higher latitudes, roughly 45 minutes, but the light quality is richer, with warmer tones and longer shadows. Here's what I've learned about the island's top light conditions:
- Summit sunrise (6–8 AM, year-round): The classic Madeira shot. Cloud inversions are most common between May and October when the temperature difference between sea level and summit creates a stable cloud layer at ~1,200 metres. This means you stand at 1,818 metres on Pico do Arieiro looking down at a sea of white with mountain peaks emerging like islands. The light is soft, golden, and directional, perfect for landscapes.
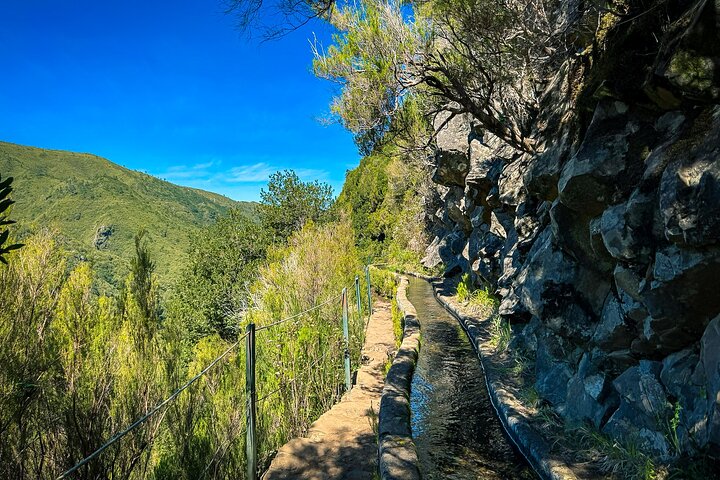
- Laurel forest after rain (any time): The north coast forests look their top in the hour after a shower. Rainwater beads on the broad laurel leaves, moss glows electric green, and the forest floor becomes a tapestry of ferns and fallen petals. Midday works here because the forest canopy diffuses the light into a soft, even glow.
- Coastal golden hour (4–6 PM, winter; 6–8 PM, summer): The south and east coasts catch impressive evening light. Ponta de São Lourenço is at its top 2 hours before sunset when the red volcanic rock glows against the blue Atlantic.
- Avoid midday (11 AM–3 PM): Harsh overhead light flattens landscapes, creates unflattering shadows on people, and washes out the greens that make Madeira's forests so photogenic. This is the time to hike between locations or eat lunch, not to shoot.
Top Photo-Worthy Hikes & Tours
🥇 PR1 Pico do Arieiro → Pico Ruivo (Sunrise Transfer)
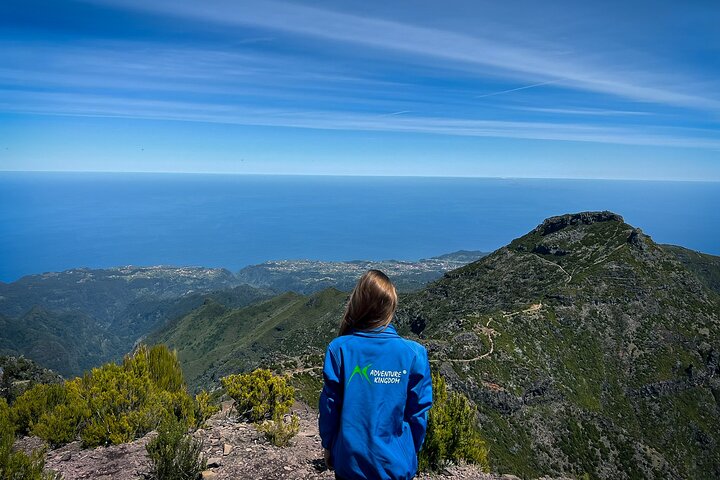
The single most photogenic hike in Madeira. The sunrise transfer drops you at the Pico do Arieiro viewing platform at ~6 AM, headlamps on, camera ready. The first 30 minutes of light are extraordinary: the cloud layer below catches gold, orange, and pink hues, while Pico Ruivo and the central massif cast long shadows across the valley. Key shots: the stone archway at the start (arrive early, it gets queued), the ridge sections with 360-degree views, and Pico Ruivo summit from the staircase approach. A guided transfer means you don't have to navigate the mountain roads in darkness, and you get picked up at Achada do Teixeira rather than hiking back the way you came. Top for: Sunrise landscapes, cloud inversions, mountain panoramas.
Photography tip: Bring a wide-angle lens (16–24mm full-frame equivalent) for the archway and ridge shots, and a 70–200mm for compressing the distant mountains. A polarising filter reduces haze at altitude. Your tripod is essential for the 6 AM darkness, the walkway gets crowded, so a small travel tripod with a ball head is better than a full-size one.
For official trail conditions and travel information, visit Visit Madeira, the UNESCO Laurissilva Forest page, and ICNF, Portuguese Nature Conservation Institute.
Sunrise transfer from $38 →🥈 Eastern Peaks Jeep Tour
The top tour for photographers who want variety without the physical effort of a long hike. The Eastern Peaks Jeep Tour covers the island's east coast in a single day: Ponta de São Lourenço (dramatic red cliffs meeting the Atlantic), Pico do Arieiro viewpoint (weather permitting), the laurel forests of the Paul da Serra plateau, and traditional villages with whitewashed churches and red-tiled roofs. The open-top Jeep gives you unobstructed views for roadside photography, and the guide knows exactly where to stop for the top compositions. Top for: Coastal landscapes, village scenes, variety in one day.
Photography tip: The tour visits Ponta de São Lourenço around midday in the standard itinerary, which is not ideal for coastal light. Ask the guide if the schedule is flexible, early morning or late afternoon light makes a dramatic difference to the red cliffs. A 24–70mm lens covers most scenes, and a circular polariser is invaluable for cutting glare off the Atlantic and saturating the red rock.
🥉 Skywalk & Cabo Girão Tour
For photographers who want vertiginous perspectives without the hike, the Cabo Girão skywalk offers a glass-floored viewing platform at 580 metres above the Atlantic. The views extend along the south coast from Funchal to Ponta do Sol, with terraced farmlands falling away beneath your feet. The tour also stops at traditional fishing villages and cliffside viewpoints that the self-drive traveller often misses. Morning light is top, the platform faces south, so the cliffs catch golden light from 7–10 AM. Top for: Coastal cliff panoramas, distinctive overhead perspectives, half-day shoots.
Photography tip: The glass floor makes for creative compositions, lie flat on the platform and shoot straight down with a 16mm lens for the classic "floating above the ocean" effect. A wide-angle lens is essential here; even 24mm feels tight when you're trying to capture the full sweep of the clifftop. The platform gets busy from 10 AM onward, so book the earliest departure for the clearest shots.
Gear Guide for Madeira Photography Hikes
After countless hikes with a camera bag, here's what I've found works and what doesn't:
Camera body: Weather sealing matters. Madeira's mountains create their own weather, I've started a hike in clear sunshine and been in freezing fog 45 minutes later. An Olympus OM-D or Fuji X-T series (both weather-sealed) are my go-to recommendations. If you're on a budget, a ziplock bag over the camera works in a pinch.
Lenses: A 24–70mm (or equivalent) covers 90% of Madeira's landscapes. I pair it with a 16mm wide-angle for the dramatic summit-to-cloud compositions and a 70–200mm for compressing layers in the Paul da Serra plateau. If you can only bring one lens, make it 24–70mm f/2.8 or f/4, the flexibility is more useful than the speed.
Tripod: Essential for the 5 AM sunrise shoots. I use a Gitzo Traveler (1.1kg) that fits inside my daypack. A tabletop tripod works for the stone wall at Arieiro viewpoint if you're packing ultralight.
Filters: Circular polariser (cuts haze at altitude, saturates greens in the forest, removes glare from wet leaves, easily the most useful filter for Madeira). 3-stop and 6-stop ND filters for smoothing water at Risco waterfall and 25 Fontes lagoon.
Bag: A 20–25L daypack that opens from the side (not top) so you can access your camera without removing the bag. I use the Wandrd PRVKE Lite. The wrong bag makes every photo opportunity feel like a hassle.
⛔ What I learned the hard way
- Batteries drain fast at altitude: On a 2°C morning at Pico do Arieiro with wind chill, my mirrorless camera battery went from full to dead in 40 minutes. Keep spare batteries in an inner pocket against your body. A hand warmer pack in the camera compartment helps.
- Cloud inversions are not guaranteed: I've done the Arieiro sunrise 12 times and gotten the perfect cloud inversion shot 5 times. The other 7 mornings varied from clear (no clouds) to completely fogged in. The sunrise transfer is worth booking for the convenience, but manage your expectations, the mountain decides what you get.
- The famous archway has a queue: The stone archway at the start of PR1 is everyone's first shot. By 6:30 AM there's a line of 15–20 photographers waiting to take their turn. My tip: hike 200 metres past the archway to the first ridge. The view is equally impressive and nobody is standing in your frame.
- Condensation in the forest: When you move from cool mountain air into a warm forest (or vice versa), your lens will fog up instantly. Keep the lens cap on for 5 minutes while the camera acclimatises. I ruined 20 minutes of shooting at Levada do Rei by rushing into the forest from a warm car.
🏆 Top Picks
PR1 Sunrise Transfer
The sunrise transfer drops you at Pico do Arieiro at ~6 AM with headlamps on, camera ready. The first 30 minutes of light are extraordinary, but the cloud inversion only happens 3 mornings out of 5. I've done it 12 times and got the perfect shot 5 times. Worth it, just manage expectations.
★ 4.8 (850 reviews) Book on Viator →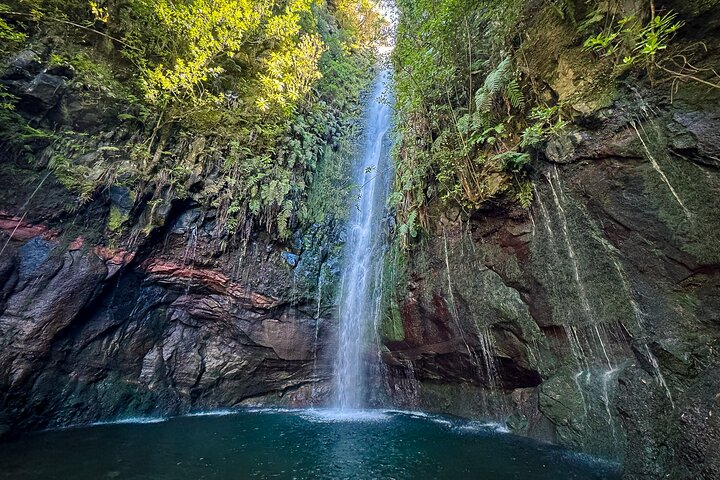
Eastern Peaks Jeep Tour
Covers Ponta de São Lourenço, Pico do Arieiro, and the laurel forests of Paul da Serra in one day. The open-top jeep gives you unobstructed roadside shots. One caveat: the standard itinerary hits Ponta de São Lourenço around midday, ask the guide if the schedule is flexible for better coastal light.
★ 4.66 (1,289 reviews) Book on Viator →
Ponta de São Lourenço Walk
Madeira's eastern tip where red volcanic rock meets the Atlantic. Top photographed 2 hours before sunset when the cliffs glow against blue water. The trail is exposed, zero shade, so avoid midday. Sunrise here is calmer than Arieiro and you'll likely have the viewpoint almost to yourself.
★ 4.62 (307 reviews) Book on Viator →What time should I arrive at Pico do Arieiro for sunrise photos?
The official sunrise time varies seasonally (6:20 AM in summer, 8:10 AM in winter). Arrive 45 minutes before the official sunrise time to set up, find your composition, and shoot the pre-dawn blue hour. The guided sunrise transfer times its pickup perfectly for this. The colour starts appearing 20 minutes before the actual sunrise. The top light is often in the 15 minutes before the sun breaks the horizon.
Can I bring a drone?
Drone use in Madeira is restricted. You need authorisation from the Portuguese National Civil Aviation Authority (ANAC) and, for natural parks, from IFCN. The Pico do Arieiro and Pico Ruivo area is inside the Madeira Natural Park, where drones are generally prohibited without explicit permits. Enforcement is inconsistent but fines exist. I do not recommend relying on a drone for your photography plan.
Last updated: June 2, 2026. Trail conditions and light conditions change seasonally, always check weather forecasts before planning a photography hike.